Skip to content
 Standard Operating Procedure of Automatic Capsule Filling Machine
1.0 OBJECTIVE:
This SOP walks you through operating the Automatic Capsule Filling Machine. We need accurate fill weights, consistent output, and zero contamination. The machine takes empty capsules, separates the caps from the bodies, fills them with powder or pellets, closes them back up, and kicks them out ready for packaging. Everything here lines up with cGMP requirements.
2.0 SCOPE:
This procedure applies to the Automatic Capsule Filling Machine in our production department. We use it for filling hard gelatin capsules with powder formulations, pellets, or granules. Covers all capsule sizes the machine can handle. What you’ll find here: assembly instructions, how to run the thing, in-process checks, and end-of-batch procedures.
3.0 RESPONSIBILITY:
Operators and Production Chemists do the hands-on work. They set up the machine, run production, and write everything down in the logs. Problems get escalated, but day-to-day operation is on them.
4.0 ACCOUNTABILITY:
Production Manager carries the accountability. They make sure operators are trained, procedures are followed, and everything stays in compliance.
5.0 PROCEDURE:
5.1 Scope out the area first. Clean? Check for the “CLEANED” label on the machine. Any dust, powder residue, or leftover capsules from the previous batch need to go before you start.
5.2 Crack open the Equipment Usage Log. Write in the date, time, product name, batch number, and your name. Don’t skip this.
5.3 Pull off the “CLEANED” label and replace it with “UNDER PROCESS.” Add the current batch details.
5.4 Hunt down IPQA for your Line Clearance Certificate. No certificate, no production.
5.5 Precautions:
5.5.1 Every guard and cover needs to be closed before you switch to auto mode. Front panels, rear covers, hopper lids – all of them. Machine doesn’t care if your hand is in there.
5.5.2 Don’t mess with the safety switches. Don’t bypass the interlocks. They’re there so you don’t get hurt.
5.5.3 No modifications without Engineering approval. That means no adding stuff, removing stuff, or “improving” anything on your own.
5.5.4 Machine running? Hands off. No adjustments, no cleaning, no lubing moving parts. Shut it down and kill the power first.
5.5.5 Any time you’re installing, disassembling, maintaining, or cleaning – main switch stays OFF.
5.5.6 Emergency stops, door interlocks, overload protection – don’t disable any of it.
5.5.7 Wipe the control panels and surfaces with a soft dry cloth only. Solvents and water will wreck the electronics.
5.5.8 The checking of safety devices happens with the machine running in auto. That’s the only way to know they actually work.
5.5.9 Run through these safety checks once a week and document them:
5.5.9.1 Hit the main power switch on the pendant. Does it cut supply? Good.
5.5.9.2 Punch the emergency stop button. Everything should freeze instantly.
5.5.9.3 Try the emergency switch on the rear safety cover. Same deal – machine stops.
5.5.9.4 Open the front door, back door, left door, right door – one at a time. Machine should halt each time.
5.6 Assembling:
5.6.1 Capsule Sorter-cum-Elevator:
5.6.1.1 Connect the sorter-elevator unit to the machine’s capsule hopper. Make sure the connection is snug.
5.6.1.2 Dump your empty capsules into the sorter hopper. Don’t overfill it or they’ll jam.
5.6.1.3 The sorter kicks out any capsules that are the wrong diameter. Only correct-size capsules make it through to the machine hopper.
5.6.1.4 Watch the first few minutes of feeding. Capsules should flow smoothly without bunching up or bridging.
5.6.2 Capsule Orienting and Loading:
5.6.2.1 Mount all the cams onto the main shaft. Tighten the keys so nothing slips during operation.
5.6.2.2 Adjust the Capsule Release Pin Block height. You want exactly one capsule dropping into each raceway slot. Too high and you get doubles; too low and you get empties.
5.6.2.3 Capsules travel down 7 vertical tracks randomly oriented – some cap-down, some body-down. The rectifier flips them all so bodies face downward, then loads them into the segment bushes.
5.6.2.4 Vacuum separates cap from body. Bodies drop into the lower segment bushes, caps stay in the upper segment bushes.
5.6.2.5 Two loading stations work together, handling 14 capsules at a time.
5.6.2.6 Line up the dosing plate with the bottom segment. The holes need to be perfectly concentric at every position or your fills will be off.
5.6.2.7 Adjust the Punch Guide Plate so punches slide freely into the dosing plate holes. Binding here means broken punches.
5.6.2.8 Set punch penetration depth to get your target fill weight. Deeper penetration equals heavier fills.
5.6.2.9 Pick the right dosing disc thickness for your product. Wrong thickness means constant adjustments and downtime.
5.6.2.10 Air pressure for the rejection system should sit between 0.5 and 1.0 kg/cm². This pushes defective capsules into the reject box.
5.6.3 Powder Filling:
5.6.3.1 Load powder into the drug hopper. The stirrer moves it into the powder tub automatically.
5.6.3.2 Powder level in the tub is controlled by sensors. Don’t mess with it manually unless something’s obviously wrong.
5.6.3.3 The tamping device does 5 progressive tamps in the dosing disc, building up a slug of powder. The 6th stroke pushes that slug into the capsule body.
5.6.3.4 Dosing disc thickness depends on your powder’s bulk density, target fill weight, and flow properties. Check the product specification sheet.
5.6.4 Pellet Filling Device (if installed):
5.6.4.1 Pellet filling works on volume. Adjust the dosing chamber size to hit your target weight.
5.6.4.2 The dose volume comes from the fixed container and movable slider block. Turn the adjustment knob to change fill weight.
5.6.4.3 There’s a dial gauge with 1-micron resolution for setting the slider position. Use it – eyeballing won’t cut it.
5.6.4.4 The filling mechanism is designed to handle pellets gently. No crushing or damaging the coating.
5.6.5 Capsule Closing and Ejection:
5.6.5.1 Closing pins push caps onto bodies and lock them together. Adjust the locked length using the fine screw adjustment.
5.6.5.2 Different capsule sizes need different closing pins. Swap them out when you change capsule size.
5.6.5.3 Filled and closed capsules get pushed out by ejection pins and slide down the exit chute.
5.6.5.4 After ejection, compressed air and vacuum blast the empty bushes clean before the next cycle loads them up again.
5.7 Operation:
5.7.1 Switch on mains power. Let the control system boot up completely.
5.7.2 Before going to auto or manual mode, turn the hand wheel on the motor shaft and rotate the turret assembly through one complete cycle. Watch everything. Feel for binding.
5.7.3 In auto mode, the machine runs self-checks before allowing startup. Let it finish.
5.7.4 On the main Control Panel screen you’ve got: auto, alarm, product, select, and sample options. Pick what you need.
5.7.5 The Auto Function Screen gives you these controls:
5.7.5.1 Start: Press this and the machine kicks into auto mode. Vacuum pump and blower fire up automatically.
5.7.5.2 Stop: Shuts everything down.
5.7.5.3 Time Reset: Hold for three seconds to reset the running time counter.
5.7.5.4 Alarm Status: Shows you what’s wrong if an alarm is active. Check here first when something stops.
5.7.5.5 Product Report: Displays total production count, today’s count, and capsules per hour rate.
5.7.5.6 Data Entry: Where you punch in batch parameters. Fill this out per your batch record.
5.7.5.7 Weight Setting: Set acceptable weight variation limits, how many capsules to average, and sampling intervals.
5.7.5.8 Sample Setting: Hit F8 to get here. Options for Take Sample, Auto/Manual mode, Tare, and Motor ON/OFF. Select what you need and the sampling-weighing sequence kicks off.
5.7.6 Fill the capsule hopper. Don’t let it run dry during production.
5.7.7 Press Start. Keep your eyes on the first hundred capsules or so. Make sure fills look right and capsules are closing properly.
5.7.8 Pull samples for IPQA checks per the batch record schedule.
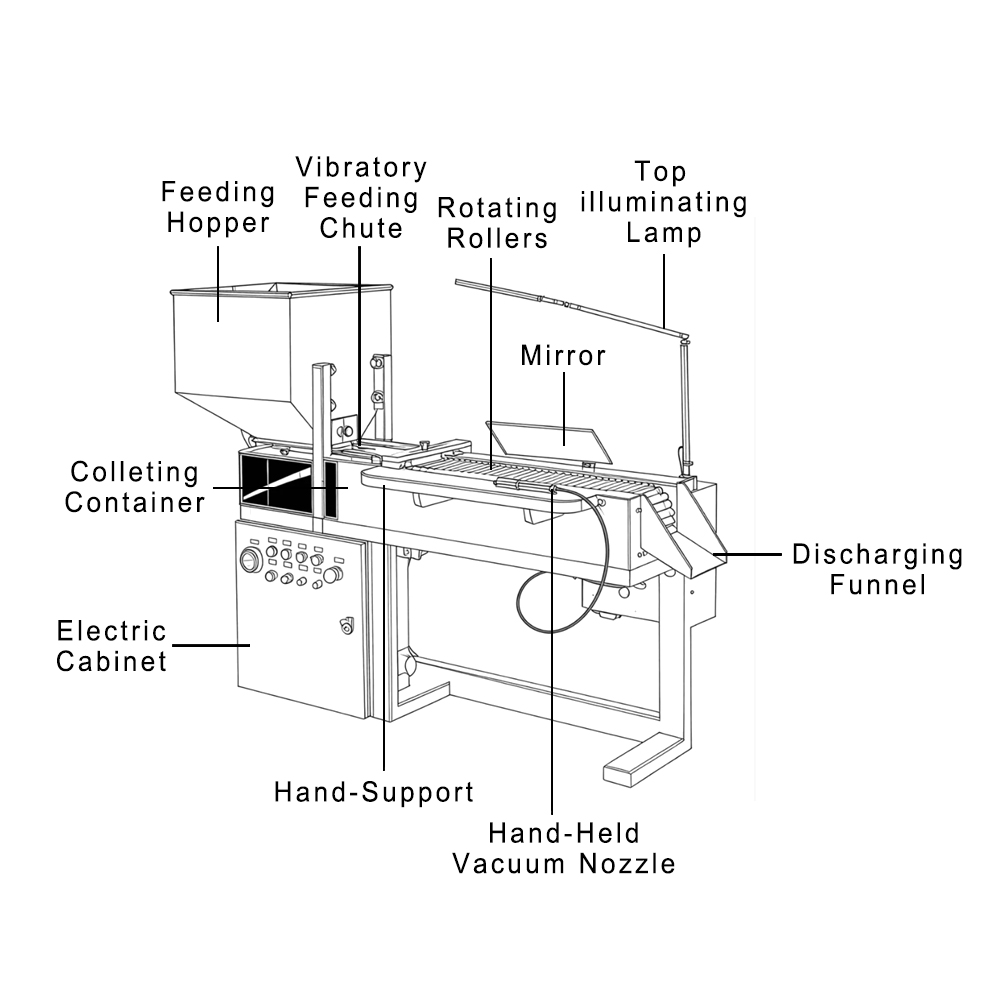
5.8 Capsule Polishing and Sorting:
5.8.1 Filled capsules go through the polisher and sorter unit next.
5.8.2 Two sorting stages here:
5.8.2.1 Plate sorter catches loose capsules – ones that didn’t close right and have caps falling off.
5.8.2.2 Drum sorter catches capsules with diameter problems – ovals, oversized, anything that won’t roll straight.
5.8.3 Starting the plate sorter: set the regulator knob to zero, flip the power switch on, then slowly turn the knob clockwise to mid position. It should vibrate smoothly – no rattling. If it rattles, back off the voltage.
5.8.4 Starting the drum sorter: hit the green button. Verify it spins clockwise when you’re looking from the discharge end.
5.8.5 Now turn on capsule flow from the filling machine.
5.8.6 Watch capsules move across the sorting plate. Moving too slow or jamming up? Bump the vibration up a bit.
5.8.7 Loose caps fall through holes in the plate. Good capsules ride over to the drum sorter.
5.8.8 The drum rotates capsules across its sorting plate. Oversized or oval capsules get trapped; good ones pass through.
5.8.9 A nylon brush mounted at the top of the drum knocks trapped defective capsules into a collection tray. Empty that tray periodically.
5.8.10 Good capsules exiting the sorter are ready for the next step.
5.9 When the batch is done, stop the machine. Remove leftover powder from the hopper and handle it per your reconciliation procedure.
5.10 Slap a “TO BE CLEANED” label on the machine with product and batch info.
5.11 Clean the Automatic Capsule Filling Machine following the equipment cleaning SOP.
5.12 RECORDS: Equipment Usage Log, Batch Production Record, In-Process Check Log, Cleaning Record.
6.0 ABBREVIATIONS:
6.1 SOP: Standard Operating Procedure.
6.2 IPQA: In Process Quality Assurance.
6.3 BMR: Batch Manufacturing Record.
6.4 cGMP: Current Good Manufacturing Practice.