Skip to content
 Paper cup machines run fast and they run hot. Parts wear out. When something fails, the whole line stops and cups stop coming out.
Knowing the paper cup machine spare parts name for each component cuts the guessing out of troubleshooting and gets the right replacement ordered fast.
That matters more than you’d think when you’re burning through thousands of cups an hour.
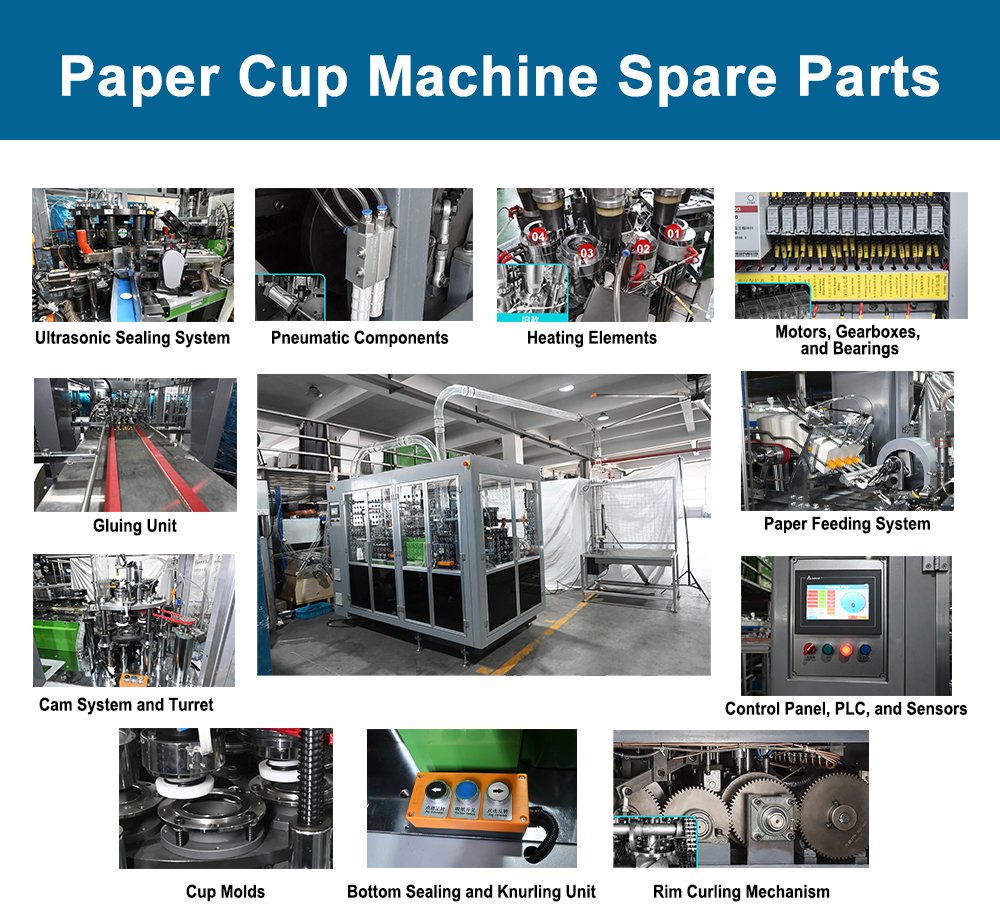
1. Cup Molds
The mold decides the shape and size of every cup the machine makes. Round, tapered, large, small. It all comes down to this one part.

Molds are usually machined from steel or aluminum. They take a beating from heat and pressure cycle after cycle. Wear shows up as cups that come out slightly deformed, with uneven walls, or that don’t stack right.
If you run multiple cup sizes, you’ll have different mold sets and swap them during changeovers. That means the molds get handled a lot. Dings and scratches from sloppy handling cause defects just as much as normal wear does. Store them properly when they’re not in the machine.
Mold alignment in the machine is worth checking after every changeover. Even a fraction of a millimeter off and the cup wall thickness won’t be uniform.
Cheap aftermarket molds exist but the tolerances are usually looser. For high-volume production where consistency matters, OEM molds pay for themselves in fewer rejects.
2. Paper Feeding System
The feeding system pulls paper from the roll and moves it into position for forming. It’s rollers, guides, tension adjusters, and sometimes belts working together.

Rollers wear smooth and lose grip. Paper starts slipping or feeding crooked. Tension springs weaken and the paper comes in too loose, which causes wrinkles in the finished cup. Guide rails drift out of alignment and suddenly every cup has a seam that’s off-center.
The paper roll holder (some people call it the unwinder) matters too. If the roll doesn’t spin freely and smoothly, the feed gets jerky. That shows up as uneven cup walls and inconsistent sealing.
Most feeding problems look like forming problems at first glance. Before you start blaming the mold or the heater, check the feed system. Nine times out of ten that’s where the issue actually is.
Paper quality plays into this too. Cheaper paperboard with inconsistent thickness or moisture content feeds differently from batch to batch. If you switched paper suppliers and suddenly the machine acts up, the feed system is fighting material it wasn’t set up for.
3. Heating Elements
On machines that use heat sealing (not ultrasonic), heating elements soften the PE coating on the paperboard so the seams bond together. They’re in the side sealing area and the bottom sealing area.

Cartridge heaters and heating pipes are the most common types. They slide into the sealing tools and heat the contact surfaces. When one dies, that section of the seal goes cold. You get cups that leak at the side seam or the bottom.
Watch for elements that are losing power but haven’t fully failed yet. The machine still runs but seal strength drops gradually. Check element resistance with a meter during scheduled stops. Catches problems before they hit the product and saves you from making cups that fall apart in someone’s hand.
4. Ultrasonic Sealing System
Newer paper cup machines use ultrasonic welding instead of heat for the side seam. The system has a generator, a transducer, a booster, and a horn (also called a sonotrode). These parts convert electrical energy to high-frequency vibrations that melt the PE coating and fuse the paper layers.

The horn is the part that contacts the cup. It wears down from constant vibration and pressure against the paper. A worn horn gives you weak or inconsistent side seams. Horns are precision machined and not cheap, but running one past its life just means more rejects.
Transducers can fail too, though less often. When one goes, the whole ultrasonic system stops working. No vibration, no seal. Generator boards are another failure point. They tend to go from power surges or overheating.
If your machine has ultrasonic sealing, keep a spare horn on the shelf at minimum. Lead times on custom horns can be weeks and you can’t run without one.
5. Gluing Unit
The gluing unit applies adhesive to the paper before forming. Some machines use it for the bottom disc, others for the side seam, and some for both.

Hot melt glue systems have a tank that melts the adhesive, a pump, heated hoses, and nozzles that apply it. Nozzles clog. Hoses develop blockages from carbonized glue. The pump wears out. And the temperature controller can drift, which changes the glue viscosity and affects how well it bonds.
Machines using water-based adhesive have a different setup but nozzles still clog and pumps still wear.
Temperature on hot melt systems has to stay in a tight range. Too cool and the glue won’t flow. Too hot and it carbonizes inside the tank, creating chunks that clog everything. Charred glue means you waited too long between cleanings.
6. Bottom Sealing and Knurling Unit
After the cup body is formed and the bottom disc is placed, the bottom sealing unit bonds them together. A knurling tool folds and presses the paper at the base of the cup to create a tight, leak-proof seal.

The knurling wheel or die wears down. The pattern gets shallow and the fold doesn’t hold as tight. Cups start leaking from the bottom. Sometimes the leak is obvious. Other times it’s slow enough that the customer finds it after filling.
Heat and pressure both have to be right for this to work. The bottom heater softens the PE coating, and the knurling tool does the mechanical work. If the heater fails, the coating doesn’t soften and the seal doesn’t hold no matter how good the knurling tool is.
Bottom sealing issues account for a big chunk of customer complaints on paper cups. A leaking bottom is the most obvious defect and the one nobody misses. Keeping the knurling tool and heater in good shape prevents a lot of returns.
The bottom disc itself has to be cut to the right diameter. If the disc cutter upstream is worn and cutting slightly oversized or undersized discs, the bottom seal won’t form right no matter how good your knurling tool is. Check both parts of the system, not just one.
7. Rim Curling Mechanism
The curling mechanism rolls the top edge of the cup outward to form the rim. That’s the lip you drink from. Without it, the cup edge is sharp and uncomfortable and the cup won’t hold a lid properly.

The curling die or roller does this job. It spins against the top of the cup and rolls the paper outward. Wear on the curling tool shows up as uneven rims, rims that crack or split, or cups that don’t accept lids.
Curling tools come in different profiles for different rim styles. If you switch cup sizes, you’ll likely need a different curling tool too.
A bad curl also affects stacking. Cups that don’t nest right jam up the counting and packaging equipment downstream. What looks like a stacking problem is often a curling problem in disguise.
8. Cam System and Turret
Paper cup machines are mostly mechanical. Cams and a turret control the timing of every station. The turret rotates and moves cups from one operation to the next. The cams push tooling in and out at exactly the right moment.

Cam followers wear out. When they do, the timing of operations drifts. Sealing happens a fraction of a second early or late. Knurling pressure changes. Cups come out with defects that seem random but are actually caused by worn cam profiles.
The turret bearings can wear too, which introduces wobble. Wobble means the cup doesn’t sit straight in the station, and that throws off bottom sealing, rim curling, everything.
Cam profiles are specific to your machine model. If you need to replace one, make sure you get the exact right part. A cam that’s close but not exact will throw timing off and you’ll spend days chasing phantom problems.
Lubricate the cam tracks and followers on schedule. Dry metal-on-metal contact accelerates wear and the noise it makes can mask other problems developing nearby.
9. Pneumatic Components
Air cylinders, solenoid valves, fittings, and tubing. Paper cup machines use compressed air for cup ejection, paper clamping, mold movements, and other functions.

Cylinders lose their seal. Valves stick. Tubing cracks. Fittings leak. All the usual pneumatic headaches. A small leak might not seem like much, but it slows down the action of whichever cylinder it’s feeding. That fraction-of-a-second delay throws off the machine’s rhythm and causes defects.
Check air pressure at the machine, not just at the compressor. Pressure drop through long runs of tubing is real. Water in the air lines is another common issue. Moisture corrodes cylinders and valves from the inside. An inline air dryer near the machine prevents most of that.
Keep a few spare cylinders and solenoid valves around. They’re not expensive and having one ready to go beats waiting three days on a shipment while the machine sits idle.
10. Motors, Gearboxes, and Bearings
The main motor drives the machine through a gearbox. Servo motors handle specific stations on higher-end machines. Bearings are in every rotating part.

Gearbox oil breaks down and gears wear. You’ll hear it first. Grinding, whining, or clicking from the gearbox means something inside is going. Bearings in the turret, rollers, and cam followers all have a service life. Replace them on schedule instead of waiting for one to seize.
Servo motors fail less often but cost a lot more to replace. Keep the critical ones documented with model numbers so you’re not scrambling during an emergency. Main drive belts and chains also wear and stretch, which changes timing across every station. Check tension regularly.
Lubrication is easy to forget but it matters. Gearboxes need oil changes on schedule. Bearings need grease. Skip it and you’re shaving months off parts that should last years.
11. Control Panel, PLC, and Sensors
The PLC runs the show. It controls timing, temperature, speed, and sequences. The touchscreen gives operators access to settings and diagnostics.

Sensors are everywhere. Temperature sensors on the heaters. Proximity sensors on the turret. Photoeyes for paper detection and cup counting. When a sensor gives bad data or stops working, the machine either shuts down or starts producing garbage.
Before you swap a sensor, clean it. Dust, paper fibers, and adhesive mist coat sensors constantly on paper cup lines. A quick wipe fixes a lot of “sensor failures” that aren’t really failures at all.
PLC programs can also get corrupted, especially after power outages. Keep a backup of the program on a USB drive somewhere safe. Reloading a backed-up program takes minutes. Rebuilding one from scratch can take days.
Touchscreens themselves crack or stop responding after years of being poked with greasy gloves. Having a spare HMI panel or at least knowing the lead time on one is smart if your machine is older.
Keeping Spares Around
Heating elements, ultrasonic horns, glue nozzles, knurling tools, and cam followers wear fastest on most paper cup machines. Keep them stocked, labeled with the machine model and part number, and stored somewhere everyone on the floor knows about.
When the line goes down at 6 AM, the last thing you want is someone flipping through a manual trying to figure out what to order.