English
  Russian
  Turkish
  Spanish
  French
  German
  Japanese
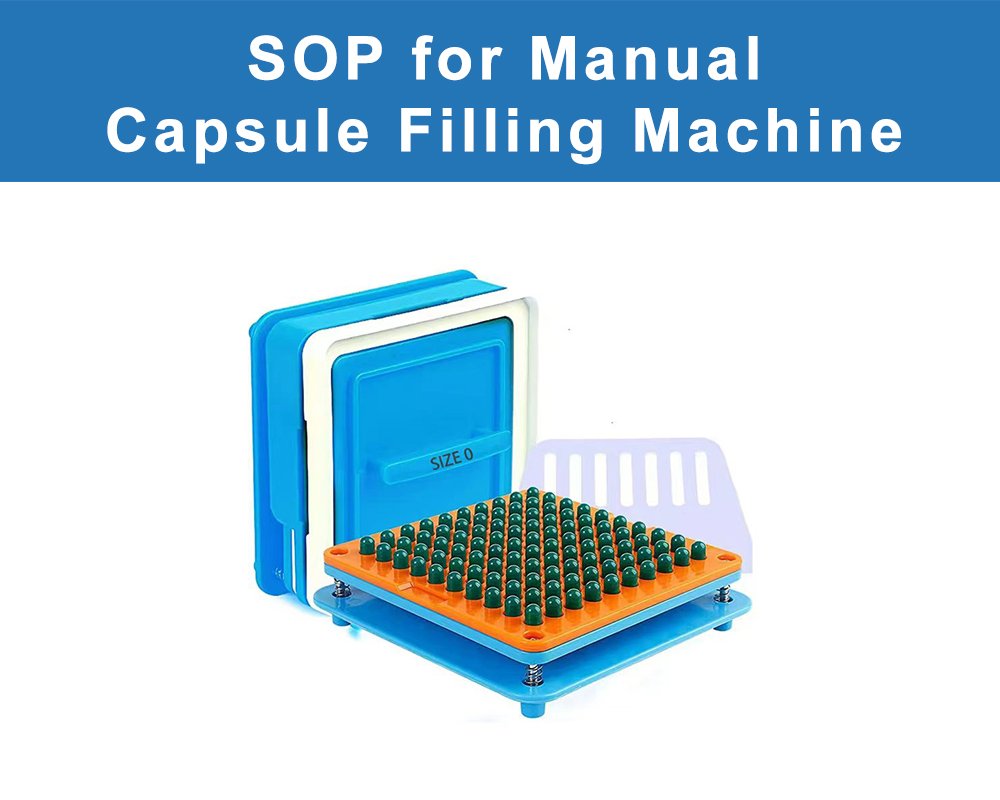
Standard operating procedure of Manual Capsule Filling Machine.
1.0 OBJECTIVE:
To lay down the Operating Procedure of Manual Capsule Filling Machine used for small batch and research scale filling of hard gelatin capsules.
2.0 SCOPE:
This Procedure applies to the Operating Procedure of Manual Capsule Filling Machine used in the pilot plant, Research and Development (R&D) lab, and small scale production area.
3.0 RESPONSIBILITY:
Filling Technician & Pilot Plant Officer
4.0 ACCOUNTABILITY:
Pilot Plant Manager.
5.0 PROCEDURE:
5.1 Look over the work bench and the machine surface. Confirm that the “CLEANED” label is fixed on the unit before any filling starts.
5.2 Note down the start up details in the Small Batch Log. Write the operator name, the product name, the batch code, the date, and the shift start time.
5.3 Take off the “CLEANED” label and display the “UNDER PROCESS” label on the machine.
5.4 Obtain a written Line Clearance from In Process Quality Assurance (IPQA). Do not begin the run without this document.
5.5 Safety and Hygiene Notes:
5.5.1 This machine is hand operated but still has pinch points. The loading plates slide against each other and can trap fingers at the edges.
5.5.2 Never force the lever if it feels stiff. A stuck lever often means a capsule is jammed. Stop and check before you apply more force.
5.5.3 The lever return spring is under load during use. Do not disassemble the spring housing without supervisor approval.
5.5.4 Some drug powders are potent at very low doses. Wear a respirator mask of the grade listed in the product handling sheet before any powder work.
5.5.5 Static electricity can build up on the plastic loading plates during dry winter months. Wipe the plates with an anti static cloth before each batch to prevent capsule sticking.
5.5.6 The bench area must stay free of food, drinks, and personal items during capsule filling. Product cross contamination is a major concern with open powder handling.
5.5.7 Wash your hands thoroughly before you handle empty capsules. Oil or moisture on skin can soften the gelatin shell and cause seal defects.
5.5.8 Standard PPE for this activity includes a clean room suit or dedicated lab coat, powder free nitrile gloves, safety glasses, a hair net, and a beard snood if applicable. Add a respirator for all potent compound work.
5.5.9 Complete the bench and machine verifications below before every new batch:
5.5.9.1 Check that the work bench is level. Place a spirit level on each side. An uneven bench will cause poor powder distribution.
5.5.9.2 Inspect the loading plates for scratches, dents, or residue from prior batches. Damaged plates must be replaced before the run.
5.5.9.3 Verify that all plate alignment pins are present and move freely. A missing pin will cause off center filling.
5.5.9.4 Sign the Bench Verification Register after each check.
5.6 Machine Parts and Setup:
5.6.1 Base Unit and Frame:
5.6.1.1 The base unit is the main body of the machine. It carries the operating lever, the plate holder, and the alignment pins.
5.6.1.2 Fasten the base unit to the bench using the clamps supplied with the machine. A loose base will shift during the lever stroke and ruin the capsule seal.
5.6.1.3 Wipe down the base with a lint free cloth moistened with 70% isopropyl alcohol. Let the surface air dry for at least two minutes before use.
5.6.1.4 Select the plate set that matches the capsule size for your batch. Common plate sets cover sizes 00, 0, 1, 2, 3, and 4.
5.6.2 Loading Plate:
5.6.2.1 The loading plate holds the capsule bodies upright during filling. The plate has between 100 and 300 holes depending on the machine size.
5.6.2.2 Place the loading plate on the base unit and engage the alignment pins. The plate should sit flat with no rocking.
5.6.2.3 Position the capsule orientation adapter on top of the loading plate. This adapter funnels capsules into the holes with their bodies pointing down.
5.6.2.4 Pour empty capsules onto the adapter. Slide the capsules back and forth across the surface with a soft brush until every hole is filled.
5.6.2.5 Remove any capsules that did not drop into holes. Return them to the empty capsule container for the next filling round.
5.6.3 Separation Plate:
5.6.3.1 The separation plate pulls the capsule caps away from the bodies. The bodies stay in the loading plate and the caps go into the separation plate.
5.6.3.2 Engage the vacuum source at the separation step. A small hand pump or benchtop vacuum works well for this size of machine.
5.6.3.3 Apply vacuum to the cap side of the capsule. The caps will lift off the bodies and stick to the separation plate.
5.6.3.4 Lift the separation plate straight up in one smooth motion. A tilt during this step will drop caps back onto the bodies.
5.6.3.5 Set the separation plate on the bench cover, cap holes facing up. Keep it away from any powder spill or airflow.
5.6.4 Powder Filling and Tamping:
5.6.4.1 Weigh the powder on a calibrated balance before the filling step. The total amount should match the theoretical fill for the batch with a small overage.
5.6.4.2 Spread the powder evenly across the loading plate using a rubber spreader or a flat card. Work from one end of the plate to the other in a sweeping motion.
5.6.4.3 Tamp the powder into the capsule bodies with the tamping tool. Apply even pressure across the whole plate surface.
5.6.4.4 Repeat the spread and tamp steps two or three times depending on the target fill weight. Over tamping can split the capsule body wall.
5.6.4.5 Sweep any excess powder off the plate with a soft brush. Collect the excess in a tared pan for reconciliation at the end of the batch.
5.7 Closing the Capsules:
5.7.1 Once the bodies are filled, the caps must be placed back and joined to form the closed capsule. The manual machine does this in a single lever stroke.
5.7.2 Place the separation plate back onto the loading plate. Align the two plates using the alignment pins on the base unit.
5.7.3 Check that each cap sits directly above its matching body. A misaligned plate will crush capsules during the closing stroke.
5.7.4 Push the operating lever down in one smooth motion. The lever drives the caps onto the bodies and locks each capsule closed.
5.7.5 Hold the lever at the bottom position for three seconds. This dwell time lets the capsule locking rings engage fully.
5.7.6 Release the lever and let it return to the top position on its own. Do not force the lever upward.
5.7.7 Lift the separation plate away. The closed capsules will remain in the loading plate holes.
5.7.8 Tilt the loading plate over a clean tray. Gently tap the plate edge to release the finished capsules.
5.8 Weight Checks:
5.8.1 Weigh the first 10 closed capsules on a calibrated microbalance. Record each weight in the Weight Check Register.
5.8.2 Compare each weight to the target fill weight listed in the batch record. The tolerance for manual filling is typically ±5% for research work.
5.8.3 If more than two capsules fall outside the limit, stop the batch and adjust the tamping pressure. Repeat the weight check after the adjustment.
5.8.4 Weigh a random sample of 20 capsules from each filled plate. Spread the sample across the plate so the check covers all hole positions.
5.8.5 Record the average, the minimum, and the maximum weight for each plate. A wide spread between min and max points to uneven powder spread during filling.
5.8.6 Separate any underweight or overweight capsules into a rework container. Do not mix them with good stock.
5.9 Visual Inspection:
5.9.1 Pour the finished capsules onto a clean inspection tray lined with black paper. The dark background makes defects easier to spot.
5.9.2 Look for these defects during inspection:
5.9.2.1 Crushed or cracked capsules that did not lock properly.
5.9.2.2 Open capsules where the cap did not engage the body.
5.9.2.3 Stained or dusty capsules with visible powder on the outer shell.
5.9.2.4 Short capsules that did not close to full locked length.
5.9.2.5 Deformed or bent capsules from excess lever force.
5.9.3 Set aside any defective capsule into the reject cup. Keep a running tally of each defect type on the Inspection Sheet.
5.9.4 Polish the good capsules by rolling them gently in a clean dry cloth. This step removes any loose powder from the outer shell.
5.9.5 Count the polished capsules in lots of 100 and transfer them to the final container. Label the container with the batch code and capsule count.
5.10 Reconciliation:
5.10.1 Count and weigh all reject capsules at the end of the batch. Record the total count and weight on the batch record.
5.10.2 Weigh any excess powder collected during the filling steps. Add this value to the reconciliation worksheet.
5.10.3 Calculate the powder accounted for as follows: powder in good capsules (good count × target fill weight) + powder in reject capsules (reject count × average fill weight) + excess powder + residual on surfaces.
5.10.4 The total powder accounted for must match the starting powder weight within ±2% to pass reconciliation. A larger gap points to a loss that needs investigation.
5.10.5 Also reconcile the empty capsules used. Starting capsule count should equal good capsules + reject capsules + unused capsules returned to store.
5.10.6 Complete the Batch Reconciliation Sheet and submit it to QA along with the finished capsule samples.
5.11 Cross Contamination Control:
5.11.1 Manual capsule filling is open to the room air. This makes cross contamination control very important between batches.
5.11.2 Use a dedicated set of plates for each product whenever possible. Label each plate set with the product code.
5.11.3 If plates must be shared between products, follow the shared equipment cleaning SOP. Run a swab test before the next batch starts.
5.11.4 Work with only one product on the bench at a time. Remove all traces of the previous product before a new one arrives at the bench.
5.11.5 Wipe down the bench, the machine body, and the tools after every batch. Use fresh cleaning cloths for each wipe down round.
5.11.6 Change your lab coat and gloves between batches of different products. This small step stops a lot of cross contamination events.
5.12 End of Batch:
5.12.1 Brush all remaining powder off the loading plate into the excess powder pan. Weigh and log the final amount.
5.12.2 Return any unused empty capsules to the empty capsule store. Label the return with the date and the remaining count.
5.12.3 Disassemble the plate set from the base unit. Do not force any stuck plate. If a plate will not come off, report to maintenance.
5.12.4 Place all used plates into the designated wash basket for the cleaning area.
5.12.5 Wipe down the base unit with 70% IPA. Pay close attention to the lever hinge and the alignment pins.
5.12.6 Fit the “TO BE CLEANED” label on the machine.
5.12.7 Clean the Manual Capsule Filling Machine as per the defined cleaning SOP.
5.13 RECORDS:
5.13.1 Small Batch Log.
5.13.2 Bench Verification Register.
5.13.3 Weight Check Register.
5.13.4 Batch Reconciliation Sheet.
5.13.5 Inspection Sheet.
5.13.6 Cleaning Record.
6.0 ABBREVIATIONS:
6.1 SOP: Standard Operating Procedure.
6.2 IPQA: In Process Quality Assurance.
6.3 QA: Quality Assurance.
6.4 PPE: Personal Protective Equipment.
6.5 IPA: Isopropyl Alcohol.
6.6 R&D: Research and Development.
References:
SOP for Capsule Polishing Machine.
SOP for Capsule Counting Machine Setup, Operation, and Shutdown.